KDP Cover Template: The Complete Guide to Getting Your Book Cover Right
Learn how to download and use the KDP cover template for paperback and ebook covers. Step-by-step guide to specs, dimensions, and common mistakes.


Your book cover is the most important thing you'll ever create for your book. But here's the catch -- before you even think about design, you need the right template. Otherwise Amazon just rejects your file.
Amazon gives you a free template that maps out the exact dimensions your cover needs to hit. Wrong dimensions, wrong bleed, text where the barcode goes? Rejected. It happens to thousands of authors every month.
What Is a KDP Cover Template and Why Do You Need One?
A KDP cover template is a file from Amazon that shows exactly how big your cover needs to be. It's not a design. It's a blueprint.
It maps out where your front cover, back cover, spine, bleed areas, and barcode all go. And it's calculated based on your specific trim size and page count.
Here's the thing most people miss: a paperback cover isn't just a front image. It's one continuous file that wraps around the whole book -- front, spine, and back. The spine width changes based on your page count and paper type. A 120-page book on white paper has a different spine than the same book on cream paper.
Get this wrong by even a tiny amount and your text shifts, images get cut off, and Amazon sends you a rejection email. The template takes the guesswork out of it.
How to Get KDP's Official Cover Template
Amazon has a free cover template calculator built right into KDP. Here's how to find it.
Step-by-Step Instructions
- Log in to KDP at kdp.amazon.com.
- Navigate to your Bookshelf.
- Click Paperback Content on the book you're working on (or start a new paperback).
- Scroll to the Book Cover section.
- Click the link for Cover Calculator (also called the "Download a cover template" option).
- Enter your book's details:
- Interior type: Black & white, premium color, or standard color
- Paper type: White or cream
- Page count: Your final interior page count (must be even)
- Trim size: The finished dimensions of your book
- Cover finish: Matte or glossy
- Click Calculate Dimensions to see your exact cover size, or Download Template to get a PNG or PDF template file.
The calculator spits out a template with colored guide zones showing exactly where everything goes. Save this file. You'll need it for your entire cover design.
What Information You Need Before Starting
You need three things locked in before you generate your template:
- Trim size: The finished width and height of your physical book (e.g., 6" x 9").
- Page count: Your total interior page count. This has to be final because it sets the spine width. Even adding two pages changes the template.
- Paper type: White or cream. Cream is thicker, so it makes a wider spine for the same page count.
Finalize your interior file first. If your page count changes later, you'll need a new template and you'll have to redo your cover layout.
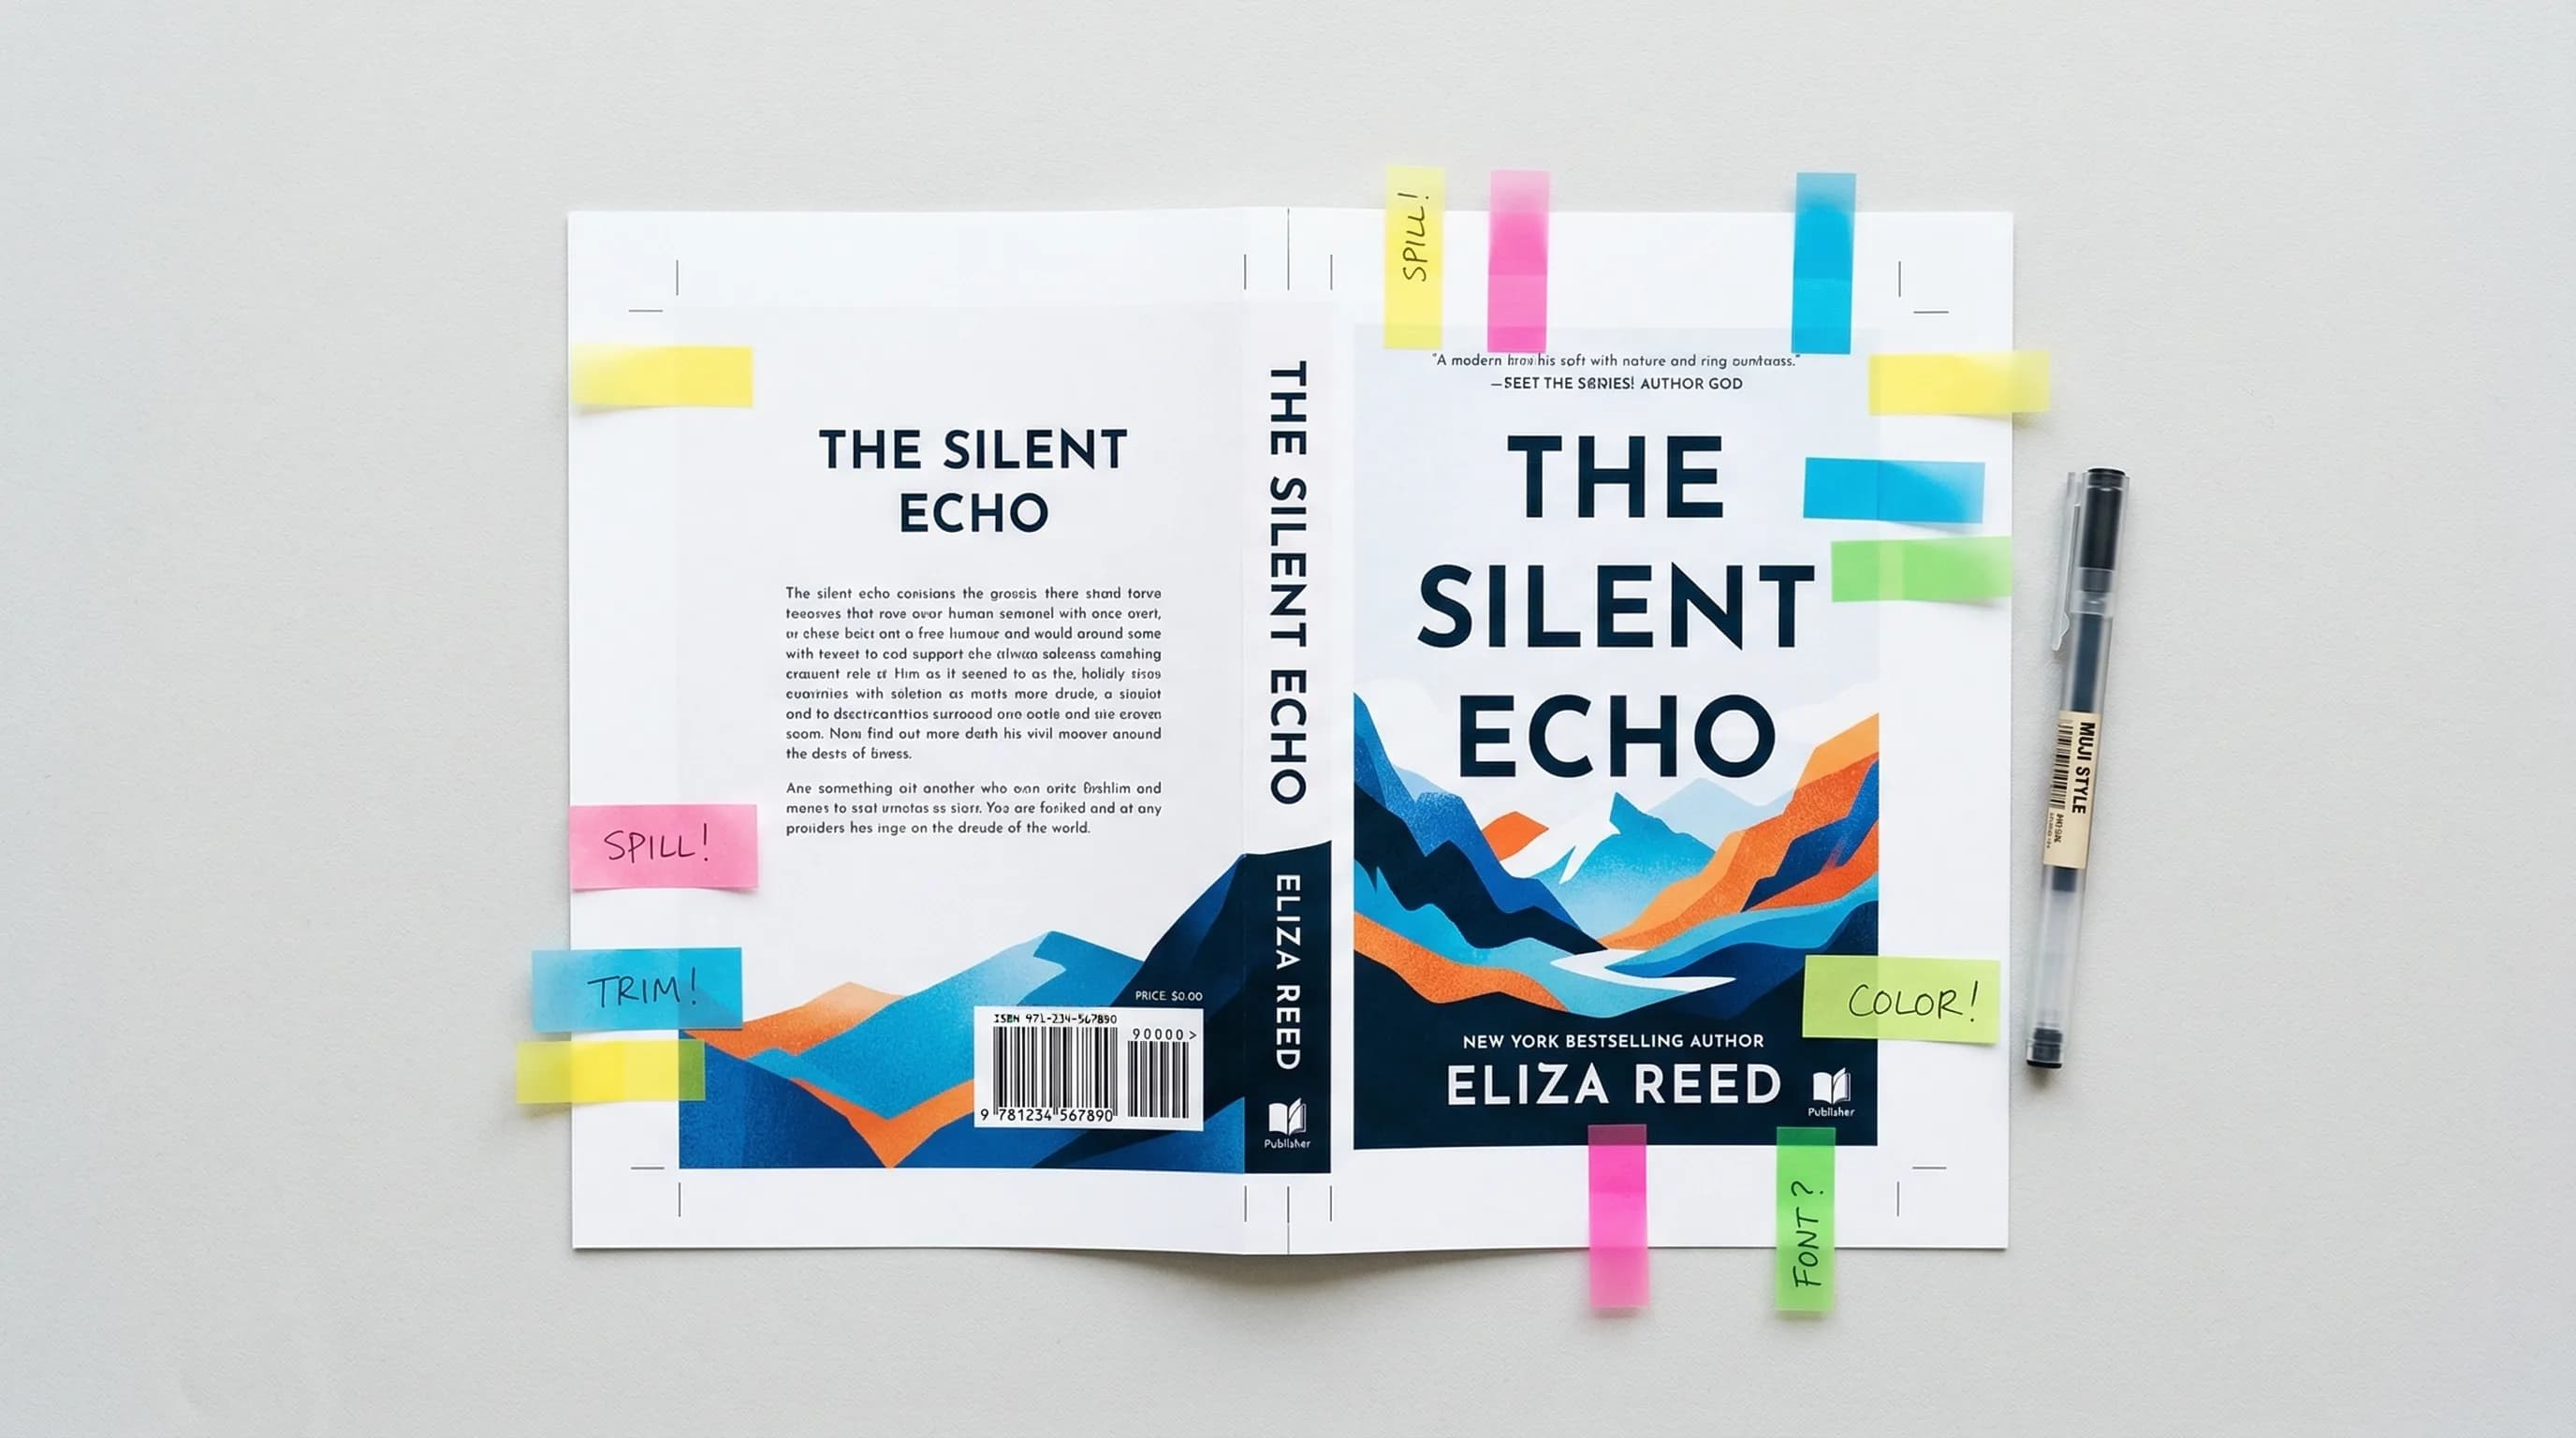
Understanding the Template Elements
When you open the template, you'll see colored zones. Each one matters.
Front Cover Safe Zone
This is where your main design goes -- title, subtitle, author name, and main imagery. The safe zone is the area that's guaranteed to be fully visible after trimming.
Back Cover Safe Zone
Same idea as the front. This is where your book description, blurbs, author bio, or photo go.
Spine Area
The spine is the narrow strip between front and back. Its width depends on your page count and paper type. Here's what to know:
- Minimum 79 pages to have any text on the spine. Under 79 pages, the spine is too narrow. Amazon will reject files that try to include spine text on short books.
- For 79+ page books, center your spine text both horizontally and vertically.
- Use a minimum font size of 7pt so it's actually readable.
- Keep spine text at least 0.0625" (1/16 inch) from the spine edges so it doesn't wrap onto the front or back cover.
Bleed Area
Why? The cutting process isn't perfectly precise. The bleed makes sure you don't end up with thin white strips along the edges if the cut lands slightly off. Always extend background colors and edge-to-edge images into the full bleed zone.
Barcode Placement Zone
Don't put anything there. Amazon overrides whatever's in that spot with the barcode.
KDP Cover Specifications
Getting the template right is half the job. Your final file also has to meet Amazon's technical specs.
Paperback Cover Specs
| Specification | Requirement |
|---|---|
| File format | PDF (preferred), JPEG, or TIFF |
| Resolution | 300 DPI minimum |
| Color space | CMYK (for print) |
| Flattened | Yes -- no layers, no transparency |
| Crop/printer marks | None -- don't include them |
| File size | Maximum 650 MB |
Go with PDF. It handles CMYK color profiles better than JPEG and keeps your text sharp because it preserves vector data. Don't include crop marks or printer marks -- the template has guide lines for reference, but your submitted file should be clean.
Ebook (Kindle) Cover Specs
The Kindle cover is simpler. It's just a front cover image -- no spine, no back cover.
| Specification | Requirement |
|---|---|
| Dimensions | 2,560 x 1,600 pixels (ideal) |
| Aspect ratio | 1.6:1 (height to width) |
| File format | JPEG or TIFF |
| Color space | RGB |
| File size | Maximum 50 MB |
The minimum is 1,000 x 625 pixels, but Amazon recommends the full 2,560 x 1,600 for the sharpest display across all devices.
Common Trim Sizes and Their Cover Dimensions
Your total cover width depends on trim size, page count, and paper type. Here are the most popular trim sizes and approximate cover heights for a 200-page book on white paper:
| Trim Size | Best For | Cover Height (with bleed) |
|---|---|---|
| 6" x 9" | Fiction, most nonfiction (industry standard) | 9.25" |
| 5.5" x 8.5" | Self-help, business books | 8.75" |
| 5" x 8" | Genre fiction (romance, mystery) | 8.25" |
| 8.5" x 11" | Workbooks, cookbooks, textbooks | 11.25" |
Always use the KDP cover calculator for your exact numbers. Don't estimate or round. Precision matters down to the thousandth of an inch.
Cover Design Tips Within the Template
Once you have the template, here's how to actually design within it.
Keep Text Inside the Safe Zone -- With Extra Margin
Spine Text Sizing
For books with enough pages for spine text (79+):
- Title: 12-14pt minimum. Bold, clear, readable at small sizes.
- Author name: 8-10pt minimum.
- Publisher logo: Keep it small and simple. Detailed logos turn into blobs at spine width.
Print a test copy at actual size. If you can't read the spine text, it's too small.
Back Cover Copy Best Practices
The back cover is prime real estate for people browsing in a bookstore. Here's a good structure:
- Hook line or genre tagline at the top.
- Book description (150-200 words). Think of it as your Amazon listing in print form.
- Social proof -- a short blurb or endorsement if you have one.
- Author bio (2-3 sentences) with an optional photo.
- Leave the bottom-right corner clear for the barcode.
Author Photo Placement
Amazon's KDP Cover Creator Tool
Pros
- Free -- no extra software needed.
- Template-accurate -- it's Amazon's own tool, so the output always meets their specs. No dimension errors.
- Simple -- pick a layout, add text, choose a background image or upload your own. You can have a basic cover in under 30 minutes.
Cons
- Limited design options -- the layouts are rigid. You can't freely position elements, layer graphics, or do anything creative with typography.
- Stock imagery -- the built-in image library is generic. Your cover may look like dozens of other books that used the same tool.
- No ebook cover export -- Cover Creator only works for paperback. You'll need something else for your Kindle cover.
- It looks like it -- readers and industry people can usually spot a Cover Creator cover. If you're taking your book seriously, the cover should reflect that.
Cover Creator works as a quick fix -- if you need to publish fast and plan to upgrade the cover later. For a book you actually care about, it's worth doing better.
Common KDP Cover Rejection Reasons
Amazon reviews every cover. Here's what gets people rejected most often and how to avoid it.
Wrong Dimensions
Your cover dimensions have to match what the template specifies for your exact trim size, page count, and paper type. The most common cause: your page count changed after you generated the template, and you forgot to update the cover.
Low Resolution
Text or Critical Content in the Bleed Area
Text in the bleed zone risks getting partially or fully cut off during trimming. Subtitles, author names, and blurbs are the usual culprits.
Barcode Area Obstruction
Text, busy patterns, or dark imagery over the barcode zone on the back cover will get your file rejected. The barcode has to be scannable.
Spine Text on Books Under 79 Pages
If your book has fewer than 79 pages and your cover has text on the spine, Amazon will reject it. The spine is just too narrow for text to print clearly.
Crop Marks or Printer Marks
Some design software (InDesign, Illustrator) can add crop marks and registration marks to exported PDFs. Amazon doesn't want these.
Your Cover Template Checklist
Before you hit submit, run through this:
- Template generated with your final page count
- Cover dimensions match the template exactly
- All text is inside the safe zone (0.25" margin from edges)
- Background images and colors extend into the full bleed area
- Barcode zone (back cover, bottom right) is clear
- Spine text only on books with 79+ pages
- Resolution is 300 DPI
- Paperback exported in CMYK; ebook exported in RGB
- File format is PDF for paperback, JPEG/TIFF for ebook
- No crop marks or printer marks in the file
- Spine text is centered and at least 7pt font
Start With the Right Template, Finish With a Professional Cover
The KDP cover template isn't optional. It's the thing that determines whether Amazon accepts or rejects your book. Download it from the cover calculator, understand what each zone means, and design within those boundaries.
Whatever tool you go with, the basics are the same: get the template right, respect the zones, and let your cover do its job -- make readers pick up your book.
Tomas Placko
“The KDP cover template exists for a reason — use it. Guessing your spine width or bleed area is the fastest way to get your cover rejected.”
Recommended Reading
How to Publish on Amazon KDP: The Complete Guide to Self-Publishing Your Book (2026)
Learn how to publish on Amazon KDP step by step. Cover account setup, formatting, pricing, royalties, keywords, and more to launch your book.
KDP Formatting: The Complete Guide to Publishing on Amazon in 2026
Learn KDP formatting for ebooks, paperbacks & hardcovers. Step-by-step specs for margins, trim sizes, file types & common errors to avoid.

Publishing on Kindle: The Complete Guide to Your First Ebook (2026)
Step-by-step guide to publishing on Kindle. Cover KDP setup, formatting, pricing, Kindle Unlimited, marketing, and common mistakes to avoid.